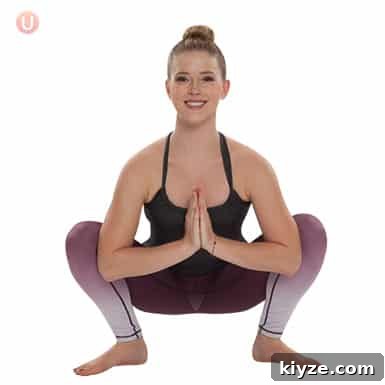
The yogi squat is one of the most effective hip-opening poses you can practice. Gentle yet powerful, it helps mobilize the hips, relieves lower back tension, and builds leg strength. It works well as a warm-up before exercise, as a cool-down afterward, or as a regular part of a yoga flow.
Yogi Squat Instructions
- Begin with your feet about hip-width to slightly wider, squat down until your tailbone settles between your ankles and your weight is balanced through the feet. Bring your hands to prayer at your chest.
- Press your palms firmly together and use the inside of your elbows to gently press against your inner thighs to open the hips. Keep the spine long and the chest lifted while allowing the knees to track in line with the toes.
- Maintain steady, calm breathing and hold the pose for 30 seconds to one minute, or longer if it feels comfortable. To come out, place your hands on the mat and slowly rise or shift weight to stand.
Benefits of Yogi Squat
The yogi squat delivers several practical benefits that make it a valuable addition to any fitness or yoga routine. It targets tight hips and hip flexors, strengthens lower-body muscles through active holding, and encourages release of the lower back. Practicing this pose regularly improves mobility, supports functional movement patterns, and can help reduce discomfort from prolonged sitting.
Stretches and Opens Your Hips
Tight hips are common for people who sit for long periods or who train primarily in linear movements. The yogi squat actively opens the hip joints and stretches surrounding soft tissue. For those with limited mobility, the pose may feel challenging at first, but consistent practice helps you sink more comfortably into the position over time.
Gives You Stronger Legs
Entering and holding the yogi squat engages the quadriceps, hamstrings, glutes, and the small stabilizing muscles around the knees and hips. Even when you hold the pose isometrically, your legs are working to maintain alignment and balance. Integrating the yogi squat into your routine can contribute to stronger, more resilient lower limbs.
Stretches and Releases Your Lower Back
By encouraging a gentle forward tilt of the pelvis and downward lengthening of the spine, the yogi squat creates space in the lower back. Slow, mindful breathing while holding the pose helps the muscles relax and release tension, making it a useful movement for relieving lower-back stiffness.
Easy Ways to Incorporate the Yogi Squat Into Your Workouts
The yogi squat works well as a standalone mobility exercise or woven into longer workouts. Its adaptability makes it suitable for stretching, yoga flows, and strength circuits. Below are practical ways to use the pose in different contexts.
Use the Yogi Squat as a Post Workout Stretch
Finish any workout with a few gentle stretches to help your muscles recover and maintain flexibility. Including the yogi squat as part of a cooldown promotes hip mobility and helps relax the lower back and legs.
Post-Workout Stretch
Try this simple cooldown sequence, holding each stretch for 30–60 seconds:
- Standing Side Bend – Right
- Standing Side Bend – Left
- Crescent Lunge on Knee – Right
- Crescent Lunge on Knee – Left
- Yogi Squat
- Pigeon Pose – Right
- Pigeon Pose – Left
- Seated Forward Fold
Use Yogi Squat in a Yoga Workout
Yogi squat integrates smoothly into yoga sequences, where it supports both strength and flexibility. Use it as a transitional pose or a recurring anchor within a short morning flow to wake up the body and steady the breath.
Sample Day Starter Sequence:
Begin standing in Mountain Pose and take five deep breaths. Flow between Mountain Pose and Yogi Squat five times to connect breath and movement. Then step wide and move through Sun God lifts five times with deep inhales and exhales. Return to Mountain Pose and cycle through this sequence five times: Mountain, Monkey Pose, Plank, Chaturanga, Upward Dog, Downward Dog. Finish by stepping forward, sitting, and holding each of these for three to five breaths: Yogi Squat, Boat Pose, Reverse Table Top, Seated Forward Fold, Happy Baby. This short flow leaves you energized and ready for the day.
Use Yogi Squat in a Strength Workout
The yogi squat can be paired with light weights or combined with other movements to create a full-body strengthening routine. For example, holding a dumbbell and performing biceps curls while in the yogi squat adds an upper-body component while continuing to open the hips and challenge the legs.
At-Home Strength Challenge
Grab a medium pair of dumbbells and move from one exercise to the next with little rest:
- Arnold Press – 10 reps
- Tricep Dips – 12 reps
- Shoulder Tap Push-Ups – 12 reps
- Squat Thruster – 12 reps (alternating)
- Yogi Squat with Bicep Curl – 12 reps
- Overhead Shoulder Press – 12 reps
- Overhead Pulls – 12 reps
- Renegade Rows – 12 reps (alternating)
Incorporating the yogi squat regularly—whether as part of yoga, mobility work, or strength training—can yield noticeable improvements in hip range of motion, leg strength, and lower-back comfort. Start slowly, focus on alignment and breath, and enjoy the benefits of this accessible, versatile pose.